How to paint a World War II Aircraft Insignia

When it comes to the painting US National insignia and military aircraft just about every step laid out step by step with detailed techniques in U.S. Army Air Force publications from the 1940's. Below is a transcribed manual (P-51 B&C Structural Repair Instructions: Finish Specifications Section 11. Published November 1st, 1943) that describes all the processes, tips, techniques, and helpful details needed to successfully paint a USAAF Star insignia with success. (Cartoons are included as well to make the study and entertaining en devour.) Read the following steps below and you’ll be fully trained in the art of creating authentic Star Insignia for your aircraft restoration, model, or hobby project! If you need a paint mask, make sure to check out our insignia and roundel page.

The following instructions have been transcribed from the US Army Air Force P-51 B&C Structural Repair Instructions: Finish Specifications Section 11. Published November 1st, 1943. You can see more aircraft manuals and technical drawings like this at AirCorpsLibrary.com

J. MARKINGS MISCELLANEOUS FG-23
(1) Refer to AAF Spec 98-24105 for miscellaneous markings, insignia locations etc. (See figures 692-a, and 692-b). Apply camouflage enamel (Spec. 14109) to exterior of plane in the pattern shown on figure 692-a. Apply insignia to the wings and Fuselage (in the locations shown in the above Figures) as follows:
P-51 B&C Structural Repair Instructions: Finish Specifications Section 11 -Figure
P-51 B&C Structural Repair Instructions: Finish Specifications Section 11 -Figure
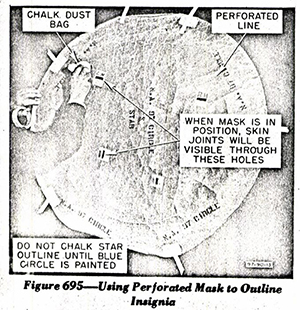
(a) With aid of a perforated mask and chalk bag, such as shown in figure 695, or by some other suitable means, mark the outline of the circle for the insignia, the diameter of the insignia on the wings is greater than that of the fuselage; hence the distance between the star points will be greater.
(b) After the outline of the circle is established, apply one inch masking tape around the outside of the circle.
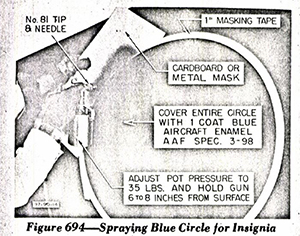
(c) Lay the mask on the masking tape and spray the entire circle with a coat of blue aircraft enamel conforming to AAF spec. 3-98 (see Figure 694).
The mask may be moved to cover successive areas of the circle as the spraying progresses. The use of a curved cardboard mask eliminated further masking, and is used correctly, no fogging will occur on the adjacent finish of the wing of fuselage. If a pot-type gun is used to apply the enamel, adjust the pot pressure to approximately 35lbs./sq.in and hold the nozzle of the gun 6-8 inches from the surface. Maximum coverage with the minimum amount of paint is accomplished in this manner.
(e) After the blue enamel has dried, mark the outline of the five-point star. This may be accomplished by any of the three methods described Below and Pictured in Figures 695, 696, and 697.
Method 1. On the back of the cardboard of light metal mask, mark off the measurements given in Figure 702. Make a mark at the top of the blue circle, and locate all the five star points by successive marks around the circumference of the circle (see Figure 696).
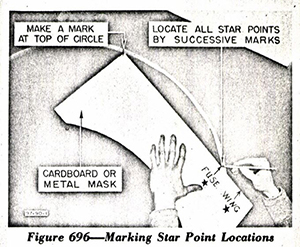
After the points have been located, draw straight lines interconnecting these points to form the Star outline.
Method 2. If a perforated mask such as illustrated in figure 695 is available, align the perforated circle with the sprayed circle, place a star points straight up if on the fuselage, or straight forward if on the wing, and dust the star outline with a chalk bag.
Method 3. Cut a star from light metal or stiff cardboard. Place the star in position on the blue circle and make a pencil mark around the edge (see Figure 697).
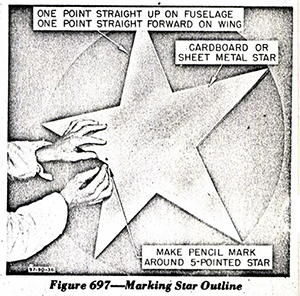
NOTE: The same Star cannot be used for the wing and fuselage, as the wing star is larger.
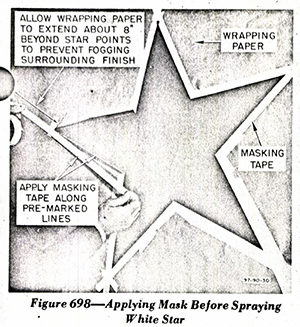
(f) Cut wrapping paper to the approximate outline of the star and hold in position with masking tape around the edge.
(g) Carefully apply masking tape along the marked outline of the star. (see Figure 698).
(h) With a spray gun of the pot or tank type, spray the star area with two coats fof white aircraft enamel conforming to AAF Spec. 3-98 (see Figure 699).
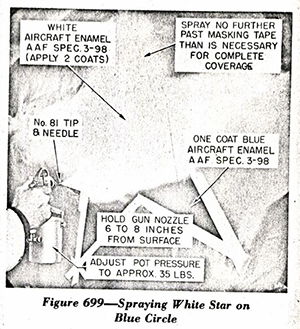
Use a No. 81 tip and needle on the spray gun and hold the nozzle 6 to 8 inches from the surface. Allow first coat to dry before applying second coat.
(i) After second coat of white enamel has dried removed the masking tape and wrapping paper.
Need to paint a star and bars insignia? We’ve got you covered. Check out our Insignia Decals Page and browse are large selection of permanent, removable decals and paint masks all drawn to military specifications and available in a variety of sizes. Custom sizing is available by request.
Check out our previous post about the Timeline of the US Air Force National Star Insignia.

